Dedicated to our Pujya Gurudev Swami Chinmayananda

Dedicated to our Pujya Gurudev Swami Chinmayananda

Hari OM!

This blog is designed to serve as a library of art and craft ideas for our balavihar children. We hope that you will find this site useful. Please feel free to use any (or all) of the projects you see posted here. We ask, however, that you refrain from publishing (in any form) these templates, instructions, and photographs, unless you receive written permission. These projects are being provided for your own personal use or use in the Balavihar classroom.


All art projects are categorized by 1) material, 2) use, and 3) type. For example a Diya greeting card would be under the labels "Paper" and "Cards," while a Lord Hanumaan puppet would be found under "Paper," "Toys and Puppets" and "Gods and Goddesses." Most materials for these projects can easily be purchased from any local craft store — and some projects involve materials you already have laying around the house.


We would love to hear your suggestions and ideas about any of the information you find on this site. And, if you have any projects that you would like to share with other seviks/sevikas, please send a picture of the finished piece, as well as instructions on how to make the project – so we can post it.


Happy Creating!

Showing posts with label Likhita Japa. Show all posts

Saturday, April 2, 2011

Lord Hanumaan

Here is a coloring sheet that our young children use to practice their likhita japa with. Have them fill in Lord Hanumaan with राम (rāma).

Materials
• Coloring page (see below)
• Markers or pens in different colors

Click on the image below and print
Make sure to adjust your brightness and printing size, if necessary.


Tuesday, March 8, 2011

Rangoli/Mandala

Some of our kindergarten friends have been asking for more rangoli mandala patterns to practice their likhita japa with ... so here is another one. Have fun!!

Materials
Crayons/Markers (colors)
Print out (see below)

Click on image and print.
Make sure to adjust your printing size and brightness, if necessary


Saturday, February 26, 2011

Lord Shiva Lingam Mandala

This is a coloring page for children to perform their likhita japa with. The younger children will probably fare better by coloring the picture with crayons and then writing on the outside border. The older children might want to try coloring the entire Shiva Lingam with likhita japa − ऊँ नमः शिवाय (om namaḥ śivāya)

This project was created to accompany the Kindergarten's Tracing Sheet ऊँ नमः शिवाय (click here to view.)

Materials
Markers/Crayons (black and red)
Writing pens
Mandala Page (see below)

Click on the image and print
Make sure to adjust your brightness and page settings on your printer, if necessary.


ऊँ नमः शिवाय Tracing Sheet

This is a tracing sheet to help children practice writing ऊँ नमः शिवाय (om namaḥ śivāya).
This project was created for the likhita japa segment of the Kindergarten Class.


Click on image to print.
Make sure to adjust color and size on your printer, if necessary.
Click on the video to see writing
strokes for ऊँ नमः शिवाय

Wednesday, January 26, 2011

Heart and Flower Likhita Japa

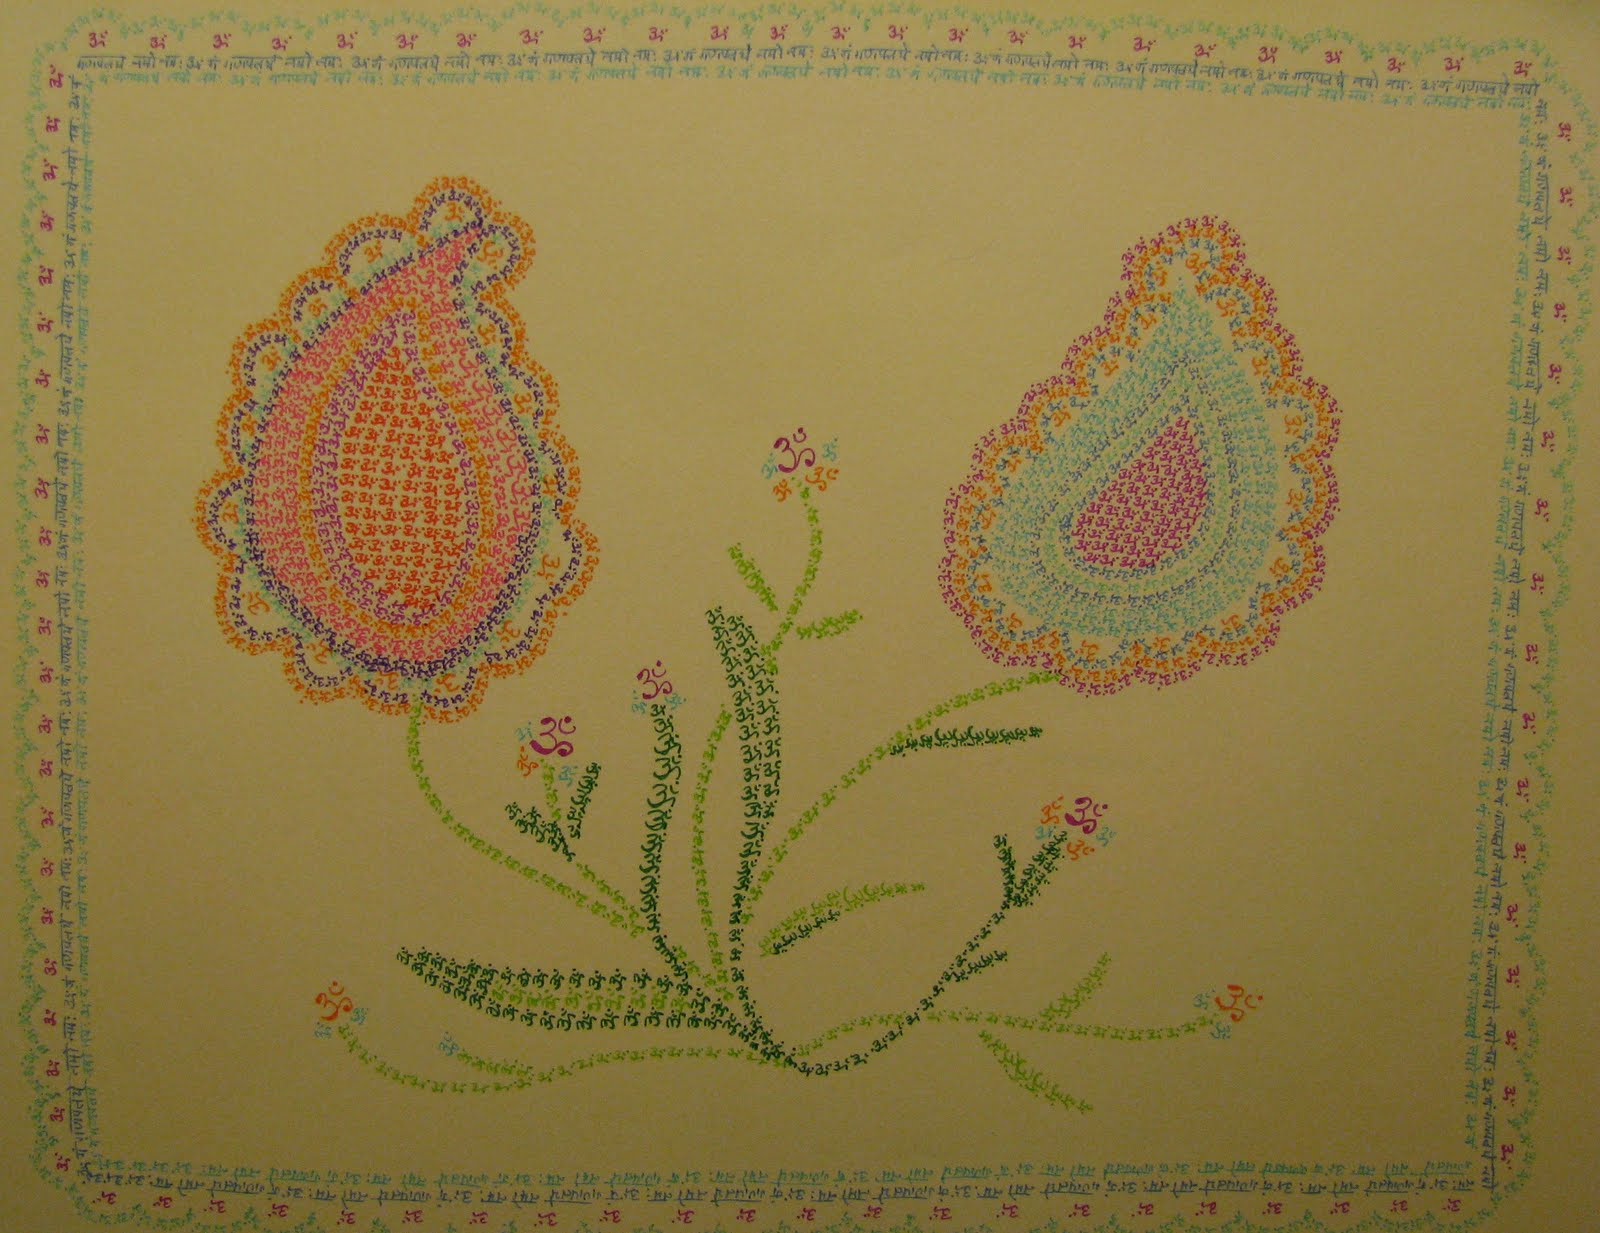
This project was designed for the kindergarten class – "K is for Kindness" and "L is for Love." The painting was done in class and the children's assignment was to take the mandala home and fill in one petal a day with likhita japa, finishing on the last day with the border. We explained to them that because love and kindness helps all things become beautiful, grow and flourish, this daily discipline will produce a most beautiful person ... filled with love and kindness (just like this painting!)

Materials
Watercolor paper
Water soluble colored pencils
Paintbrush
Small bowl of water
Heart and Mandala Template (see below)
Fine point writing pens (black or colors)

Directions
1. Copy the Heart and Mandala Template onto card stock paper. Cut out.

2. Using a water soluble pencil, trace the mandala onto your piece of watercolor paper.

3. Then using the same colored pencil, trace the hearts into a flower shape (inside the mandala) onto the watercolor paper.

4. Once the design is in place, have the child color the entire mandala with the water soluble pencils. It is good to emphasize that you should not apply too much color. The pressure should be light and consistent.

5. After coloring, it's time to bring out the brush! Dip the brush in water. Give it a shake or two to remove the excess water. And then begin painting over your design. Be prepared for lots of "ooohs and aahhhs" — it's a lot of fun to watch the colored pencils turn into paint!!

Click on the template page below and print.
Be sure and adjust your printing size, if necessary.


Mandala colored with pencils
Water brushed on to the colors.
Likhita japa added to the painting


Saturday, January 22, 2011

Likhita Japa Painting

This project was created for our Kindergarten Class "J is for Japa. This is a very simple technique. All you need is:

Materials
• Watercolor paper
• Water soluble colored pencils (These can be found in most craft/art stores)
• Paint Brush
• Water
• Black writing pens (or color pens for more complicated patterning)

Directions
1. With a bowl (or circle template) trace your mandala circle in the center of your paper. Then with the watercolor pencils lightly color in your areas. (We like to use no more than 3 or 4 colors.)

2. After you are satisfied with the coloring, take your brush (dipped in water) and paint over your drawing. It's like magic — the colored pencils turn into watercolor!!  The younger kids really love this part.

3. Once your painting is completely dry, you can begin your likhita japa. Have them work from the outside of the circle inwards — finishing with a beautiful, silent OM.

Here are a couple of samples we share with the children to emphasize
the importance of neat and steady handwriting.


Saturday, December 4, 2010

Lord Raama's Lotus Feet

Here is a very simple outline of Lord Raama's feet for the children to do their creative likhita japa with. All you need are a few colored writing pens and a copy of the image below. Have fun!

Click on the image and then print. 

Saturday, November 20, 2010

Peacock Feather Drawing

The peacock feather is a fun image to do creative likhita japa with — the lines are extremely easy to follow. A good writing strategy is to start at the base of a line and work upwards. Make sure to finish one full line of the feather before moving on to the next.

Because older children are able to write smaller (and have greater focus), they might want to try a full mantra such as ऊँ श्री कृष्ण शरणं मम (om shree krishna sharanam mama). Younger children will probably fare better with filling the picture with ऊँ, aum or OM and using colors. What is important for us to remember is that the objective with these art exercises is that the child experiences joy while chanting the Lord's name — how "well or proper" they do it is secondary :-)

Happy Likhita Japa!!!

Materials:
• Good writing pens

Black artist pens, with different sized nibs, create beautiful tones. An excellent pen to look for is Prisma Color. You can find them at any quality craft or art store. A complete set comes in sizes .005, 01, 03, 05 and 08 — which is a perfect range of line widths. Other good pens are Micron (by Sakura) and Staedtler Triplus Fine liner.

Click on the image and print. If you want lighter lines, adjust your printer contrast setting.


Tuesday, August 31, 2010

Lotus Mandala


This Lotus Mandala was designed for creative likhita japa. With the first image, the child can write their mantra tracing the lines and then color it in with crayons — or better yet, design and color it with likhita japa! (The second image was drawn with ऊँ and OM.) 

For a finishing touch — don't forget to add sequins and gems for decorations.

This lotus is abstract enough that it can also be used as a Sun.

Another idea for an art project, is to print this on card stock paper. Once the lotus is completely decorated and colored in, cut around the circle and glue onto a greeting card. Make sure you reduce the image to your desired size before printing.

Tip: If you want the outlines to be extremely faded, just adjust the lightness on your printer and then print.


Monday, August 30, 2010

Ganesha Mandala

This page was designed for creative likhita japa. With the first image, the child can write their mantra tracing the lines and then color it in with crayons — or better yet, color with likhita japa! (The second image was drawn with ऊँ गं गणपतये नमो नमः OM gam gaNapataye namo namaH.)

For a finishing touch — don't forget to add sequins and gems for decorations.

Another idea for an art project, is to print this on card stock paper. Once Lord Ganesha is completely decorated and colored in, cut around the circle and glue onto a greeting card. Make sure you reduce the image to your desired size before printing.

Tip: If you want the outlines to be extremely faded, just adjust the lightness on your printer and then print. 

To print the page below, click on the image and then print.


Likhita Japa Mandala (2)

This is an outline for making a creative likhita japa mandala. The child can write around the mandala or make abstract designs inside the boundary — whatever they choose! Color pens are more fun and promote creativity with younger children, so we recommend having at least 4 or 5 different colors available.

Have fun!!

For some pattern ideas go to the label "Lihita Japa" (on the right side of this page.)

To print the mandala outline below, click on the image and then print.


Likhita Japa Mandala 1

This is an outline for making a creative likhita japa mandala. The child can write around the mandala or make abstract designs inside the boundary — whatever they choose! Color pens are more fun and promote creativity with younger children, so we recommend having at least 4 or 5 different colors available.

Have fun!!

For some pattern ideas go to the label "Lihita Japa" (on the right side of this page.)

To print the mandala outline click on the image and then print.

Rangoli (Drawn in OM)

The Rangoli pattern was created with likhita japa (ऊँ and OM). This page is for children to practice their creative likhita japa with. If the child is going to write in colors, it is suggested that they have at least 4 colors to start with. For black and white likhita japa, we suggest having different sized Black pen widths available to create tones.

Another idea for an art project, is to print this on card stock paper. Once the Rangoli is completely decorated and colored in, cut around the pattern and glue onto a greeting card. Make sure you reduce the image to your desired size before printing.

Materials
• Writing pens in different colors (or black) and sizes. (005, 01, 03 and 05 are recommended sizes to begin with. Most of these pens can be found in a good quality stationary or art store. We use Prisma Color, Staedler and Sakura brands.)

The colored image below was done with Prisma Color pens (size 005).

For ideas on different pattern techniques, visit the label "Likhita Japa" (on the right side of this page.)

 To print the page below: Click on the image and print.

Diya (Drawn in OM)

This diya coloring page was created by OM likhita japa. This is a perfect page for young ones to practice their creative likhita japa with. They can color and decorate this page by writing ऊँ in many different colors and sizes — or they can just plain color.

Another idea for an art project, is to print this on card stock paper. Once the diya is completely decorated and colored in, cut around the circle and glue onto a greeting card. Make sure you reduce the image to your desired size before printing.

Materials:
Colored writing pens in different nib widths. (Ultra Fine, Fine, and regular are good sizes to begin with.)

To Print the page below. Click on the image and print.


Friday, June 11, 2010

Shiva Lingam Mandala (Likhita Japa)


This mandala is dedicated to Guruji
Summer Camp 2010


Click on the image to view enlarged.

This mandala was created with likhita japa of "ऊँ नमः शिवाय" (OM namah Shivaaya.) Lightly trace the inner and outer circles with a pencil and bowl (or circle templates) . Once you are satisfied with the proportions, begin the likhita japa session with your writing pens. All pencil lines should be gently erased after the ink has thoroughly dried. The Shiva Lingam was painted (with gouache) in the center as a point of reflection after the japa session was completed.

Materials
• Good quality writing pens with different nib sizes
• Good quality Bristol paper (smooth vellum surface)
• Pencil
• Graphic eraser
• Gouache paints
• Paint brushes
• Gold metallic calligraphy pen/ink

Wednesday, June 2, 2010

OM Likhita Japa


Click on image to view enlarged

This likhita japa was created from doodling patterns (see previous posting in May archive.) The entire mandala was designed with variations on OM.

Materials Needed:
• A smooth surface paper
• Pens of different sizes
• Bowls (or compass) for tracing circle outline
• Pencil
• Quality graphic eraser

Lightly sketch the outline design with a pencil — your details will emerge from the japa. Do not sketch the writing in ... that should be performed in ink when you begin your session. Gently erase all pencil lines only when you are completely finished with the likhita.

Experiment with color, too!

Thursday, May 20, 2010

Peacock Feather Likhita Japa


This likhita japa is dedicated to Swamiji
Summer Camp 2010


Click on the image to view enlarged.
The feather outline was lightly sketched in pencil before the japa began. With the outline in place, one can completely focus on writing the mantra without getting distracted by composition or placement. When the likhita japa session is completely finished (and the ink is dry), then the pencil lines can be gently erased.

For summer camp 2010 we will be encouraging the older children to perform likhita japa with their color and composition studies.

Monday, May 17, 2010

Paisley Flowers in Likhita Japa


This likhita japa is dedicated to Guruji.
Summer Camp 2010

Click on image to view enlarged.

These flowers were created solely from OM. The picture outline was lightly sketched in pencil before the japa began. With the outline in place, one can completely focus on writing the mantra without getting distracted by composition or placement. When the likhita japa session is completely finished (and the ink is dry), then the pencil lines can be gently erased.

For summer camp 2010 we will be encouraging the older children to perform likhita japa with their color and composition studies.

Tuesday, May 4, 2010

Likhita Japa Drawing (Lord Ganesha)


This drawing is dedicated to Guruji
Summer Camp 2010

Click on the image to view enlarged.

Here is a sample of a Likhita Japa Drawing. A very light pencil sketch was done outlining Lord Ganesha before the likhita japa session began. The outline was put in only to help guide the japa, so that focus would not be lost. Once the likhita was completely finished (and the ink was dry) the pencil lines were erased with a graphic eraser.

Materials
• bristol drawing paper
• black pens in different widths
• a pencil
• a good graphic eraser.

Some suggestions of images for the older children to try:

• a Shivalingam
• a diya
• a lotus flower
• a Rangoli pattern

Likhita Japa Doodling


Summer Camp 2010
Click on the image to view enlarged

Doodling is an all-time favorite calming activity — especially for older school children. Why not encourage them to doodle while doing likhita japa?

Here are two sample pages of "japa doodle drawing." The only materials necessary for doodling is a smooth piece of drawing paper, pencil, graphic eraser and a black pen in 3 different widths — thick, fine and super/extra fine. Tell the child to let their pen go where the japa takes them!