Hari OM!
This blog is designed to serve as a library of art and craft ideas for our balavihar children. We hope that you will find this site useful. Please feel free to use any (or all) of the projects you see posted here. We ask, however, that you refrain from publishing (in any form) these templates, instructions, and photographs, unless you receive written permission. These projects are being provided for your own personal use or use in the Balavihar classroom.
All art projects are categorized by 1) material, 2) use, and 3) type. For example a Diya greeting card would be under the labels "Paper" and "Cards," while a Lord Hanumaan puppet would be found under "Paper," "Toys and Puppets" and "Gods and Goddesses." Most materials for these projects can easily be purchased from any local craft store — and some projects involve materials you already have laying around the house.
We would love to hear your suggestions and ideas about any of the information you find on this site. And, if you have any projects that you would like to share with other seviks/sevikas, please send a picture of the finished piece, as well as instructions on how to make the project – so we can post it.
Happy Creating!
Thursday, April 8, 2010
Likhita Japa
Summer Camp 2010
Here are some samples of likhita japa that have been written in color ink. It is recommended that the children begin with simple shapes and just a few colors (no more than three.) All shapes and colors should be decided upon before likhita japa begins — they don't want to be making decisions while writing.
It is also important to tell the children that there are no mistakes in likhita japa. They are to forget all the rules they learned about writing on a straight line (or coloring inside the lines) — this is the child's personal journal and they should be free to explore this process any way they choose. If they decide to write in one corner of the page, leaving the rest of the page blank — that is perfectly fine! These pages are not being exhibited at a National Art Gallery, so please don't judge their work. The goal is to encourage the child to connect with their mantra and enjoy the process — it makes no difference whether they write in a linear mode or just plain doodle.
The erasers are to be put away before the writing session begins. No one should be allowed to touch an eraser during likhita japa. All pencil markings can be removed after the japa session has ended.
Here's a good first exercise: Try using color as a way to refocus the mind by having the children begin writing with one color. Tell them that once their mind begins to wander, they should put down their pen and pick up another color. Continue writing and repeat this process until the japa session is finished. When they are done, have the children spend a few minutes reflecting on their writing —making sure to count how many times their thoughts left the page. It's fun to try and do this regularly until everyone ends up with only one color. An agreed amount of time for the japa session should be decided on — you can set a timer to let everyone know when the session is over. As the child's ability to focus strengthens, increase the time.
Materials Needed
• Regular color writing pens. (Fine and medium points are good.)
• Sketchbook or drawing paper with a smooth surface.
• A pencil and good eraser
Directions
1. If the child wants to do circular likhita japa, trace a bowl onto the center of the page. (He/she can also lightly sketch out any other geometric shapes to write into. Make sure, however, that the shapes are basic outlines — there should be no details drawn with the pencil.)
2. Have the child work from the outside of a shape (or the page) to the center.
To view any of the photographs enlarged, just click on the picture.
Summer Camp 2010 – Week 1
Photographs are copyrighted. 2010
Wednesday, April 7, 2010
Color Study
Summer Camp 2010
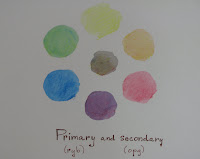
This is a very simple lesson in creating a color wheel using the three primaries: red, blue and yellow. Check out the following sites for some great information on the basics of primary, secondary, tertiary, complimentary and analogous colors:
Arty Factory (click here to view)
Middle School Color Theory Projects (click here to view)
Lesson Plans Page (click here to view)
To make an easy, no mess, color wheel you will need:
• Red, Blue and Yellow water-soluble color pencils (We used Caran'dache supracolor — carmine red, sapphire blue and yellow to make the samples shown.)
• a small dish of water
• a paintbrush
• water color paper
Helpful Hints:
• To create a consistent paint blending we laid down the lighter color first, with the darker on top.
• After all the colors have been drawn with the pencil, lightly brush water onto the circles. Like magic you will see a watercolor painting emerge.
• After completing a color wheel, have the children try sketching out a grid of squares. Then with their three pencils, create paintings incorporating all the color combinations they learned with their wheel. (Try some with only secondary colors, some with one primary and 2 secondary, 2 complimentaries, etc. There are many variations on this theme — let them have some fun exploring!)
• If you want the children to understand tints and shades of colors, you can give them a White pencil to mix with. (Tints are the hues (colors) with white added. Shades are the hues with black added.


